The ultimate guide to fixing a leaky roof yourself
Jack
The ultimate guide to fixing a leaky roof yourself
Understanding the Causes of Roof Leaks
Roof leaks can be a significant concern for homeowners, leading to both minor inconveniences and major structural damage if left unchecked. Understanding the common causes of roof leaks can help you prevent future issues and fix existing ones efficiently. Some of the most frequent reasons for roof leaks include:
Poor installation or maintenance
Damaged or missing shingles
Clogged gutters and downspouts
Improperly sealed roof valleys
Cracked flashing or sealant around roof penetrations
Identifying the Source of the Leak
Before you can repair a leaky roof, it’s essential to locate the source of the leak. This can be more challenging than it seems, as water can travel a significant distance from the entry point before it starts to show inside your home. Here’s a step-by-step process to help you identify the source of your roof leak:
Inspect the attic: Using a flashlight, examine the attic for signs of water stains, mold, or damaged insulation. This can help you narrow down the general area of the leak.
Check the roof exterior: Climb onto your roof and look for damaged or missing shingles, cracked flashing, and other potential entry points for water.
Examine roof penetrations: Pay close attention to areas where the roof meets chimneys, vents, and skylights, as these are common sources of leaks.
Gathering the Necessary Tools and Materials
Once you’ve identified the source of the leak, it’s time to gather the tools and materials you’ll need to fix it. Having everything ready before you start the repair process will save you time and make the job go more smoothly. Here’s a list of common tools and materials you’ll need for most roof repair projects:
Roofing nails
Roofing cement or sealant
Hammer or nail gun
Utility knife
Roofing shingles
Flashing
Putty knife
Caulking gun
Ladder
Safety harness
Repairing Damaged or Missing Shingles
One of the most common causes of roof leaks is damaged or missing shingles. Fortunately, fixing this issue is relatively straightforward. Follow these steps to repair or replace damaged shingles:
Remove the damaged shingle: Carefully lift the edges of the surrounding shingles and remove the nails holding the damaged shingle in place. Slide the damaged shingle out from under the surrounding shingles.
Install the new shingle: Slide the new shingle into place, aligning it with the surrounding shingles. Secure the new shingle with roofing nails, making sure to nail both the top and bottom edges.
Seal the edges: Apply a layer of roofing cement or sealant under the edges of the surrounding shingles to ensure a watertight seal.
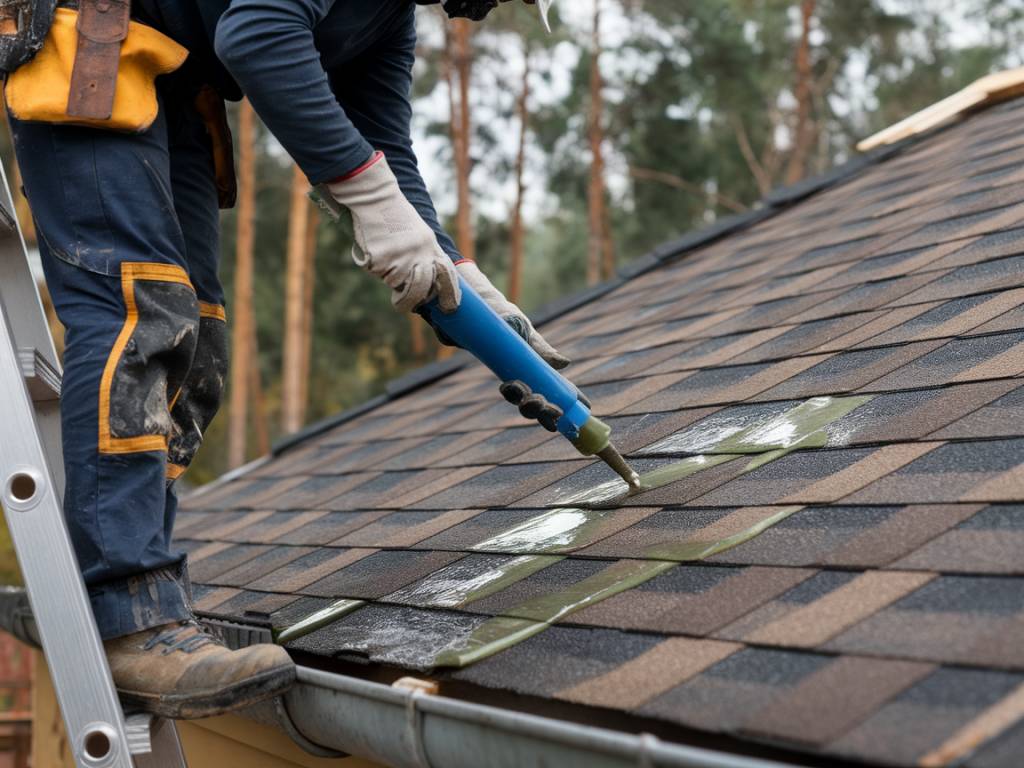
Sealing Leaks Around Roof Penetrations
Leaks around roof penetrations, such as chimneys, vents, and skylights, are common and can cause significant damage if not addressed promptly. To seal leaks around roof penetrations, follow these steps:
Remove old sealant: Use a putty knife or similar tool to remove any old, cracked sealant around the penetration. Be careful not to damage the surrounding shingles or flashing.
Apply new sealant: Using a caulking gun, apply a generous bead of roofing cement or sealant around the base of the penetration. Make sure to cover any gaps or cracks thoroughly.
Check the flashing: Ensure that the flashing around the penetration is in good condition and properly secured. If the flashing is damaged, replace it with new flashing material.
Fixing Roof Valleys
Roof valleys, where two roof planes meet, are another common source of leaks. Water can easily collect in these areas, leading to leaks if the valley is not properly sealed. Here’s how to fix leaks in roof valleys:
Clear debris: Remove any leaves, branches, or other debris from the roof valley to ensure proper drainage.
Inspect the valley flashing: Check the metal flashing along the valley for signs of damage or wear. If the flashing is damaged, you’ll need to replace it.
Seal the valley: Apply a layer of roofing cement or sealant along the edges of the valley flashing to create a watertight seal.
Install new shingles: If necessary, install new shingles along the edges of the valley, making sure to overlap the existing shingles for proper water runoff.
Replacing Damaged Flashing
Flashing is an essential component of a watertight roof, as it helps seal areas where the roof meets walls, chimneys, and other structures. If your flashing is damaged, it can lead to leaks. To replace damaged flashing, follow these steps:
Remove old flashing: Carefully remove the damaged flashing by prying up the surrounding shingles and removing any nails or screws holding the flashing in place.
Install new flashing: Cut a piece of new flashing to fit the area and slide it into place under the surrounding shingles. Secure the flashing with roofing nails or screws, making sure to fasten it tightly to prevent water from seeping underneath.
Seal the edges: Apply a layer of roofing cement or sealant along the edges of the new flashing to create a watertight seal.
Preventative Maintenance Tips
Regular maintenance can help prevent roof leaks and extend the lifespan of your roof. Here are some preventative maintenance tips to keep your roof in good condition:
Inspect your roof regularly: Check your roof for signs of damage or wear at least twice a year, preferably in the spring and fall.
Clean gutters and downspouts: Make sure your gutters and downspouts are free of debris to ensure proper drainage and prevent water from backing up onto your roof.
Trim overhanging branches: Trim any branches that hang over your roof to prevent them from damaging your shingles during storms.
Check attic ventilation: Proper attic ventilation can help prevent moisture buildup and reduce the risk of roof leaks.
When to Call a Professional
While many roof leaks can be fixed with a bit of DIY know-how, there are some situations where it’s best to call in a professional. Here are a few scenarios where you should consider hiring a roofing contractor:
Extensive damage: If your roof has widespread damage or multiple leaks, a professional inspection and repair may be necessary.
Structural issues: If you notice signs of structural damage, such as sagging or rotting roof decking, a professional can assess the extent of the damage and make the necessary repairs.
Steep or complex roofs: If your roof is particularly steep or has complex features, such as multiple valleys or intricate flashing, hiring a professional can ensure the job is done safely and correctly.
By following the steps outlined in this guide and performing regular maintenance, you can keep your roof in good condition and protect your home from water damage. Whether you choose to tackle the repairs yourself or hire a professional, addressing roof leaks promptly is essential for maintaining the integrity of your home.
Pour offrir les meilleures expériences, nous utilisons des technologies telles que les cookies pour stocker et/ou accéder aux informations des appareils. Le fait de consentir à ces technologies nous permettra de traiter des données telles que le comportement de navigation ou les ID uniques sur ce site. Le fait de ne pas consentir ou de retirer son consentement peut avoir un effet négatif sur certaines caractéristiques et fonctions.